SDL2 Devlog
I have been working on an editor for the One Bit Image file format in Rust and SDL2. This entry in my blog follows my progress on the editor. The days are listed in reverse chronological order, begin from the bottom, if this is your first time on this page.
Day 20
More lisp stuff! I added a new brush, for rectangular
selections. While selection doesn’t do much on its own, the selected
area can be passed onto a lisp procedure, for example, a
procedure to draw horizontal black and white lines:
Day 19
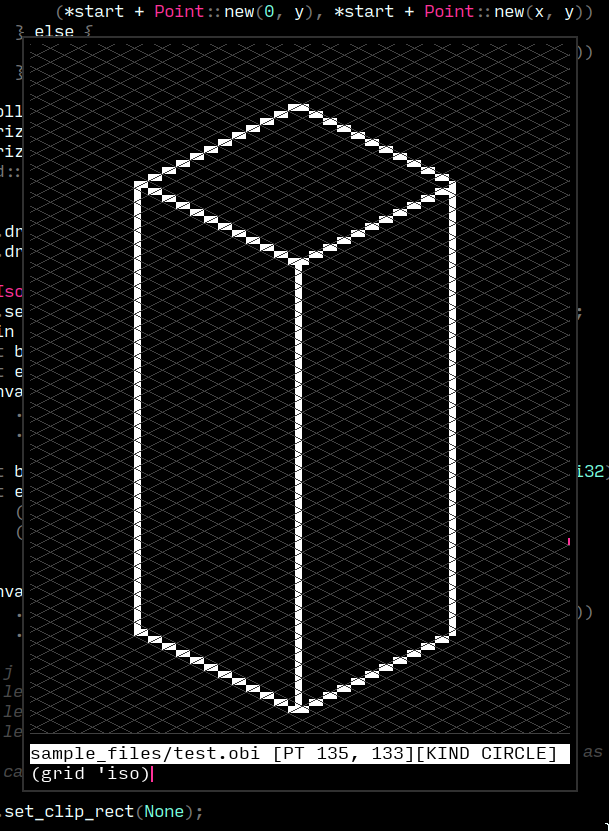
Attempted some isometric art within the editor. The angles displayed alongside the line brush are handly, however, having only a rectangular grid did not help. I implemented an isometric grid today. Isometric grids in pixel art differ in that the tangent of the isometric angle is exactly 0.5! For every pixel down, you go exactly two pixels sideways. The math works out really well in the drawing procedures too, dealing with floating points is a pain.
Day 18
I added basic support for guides, they can be added and activated
from the lisp REPL. Another long standing improvement I
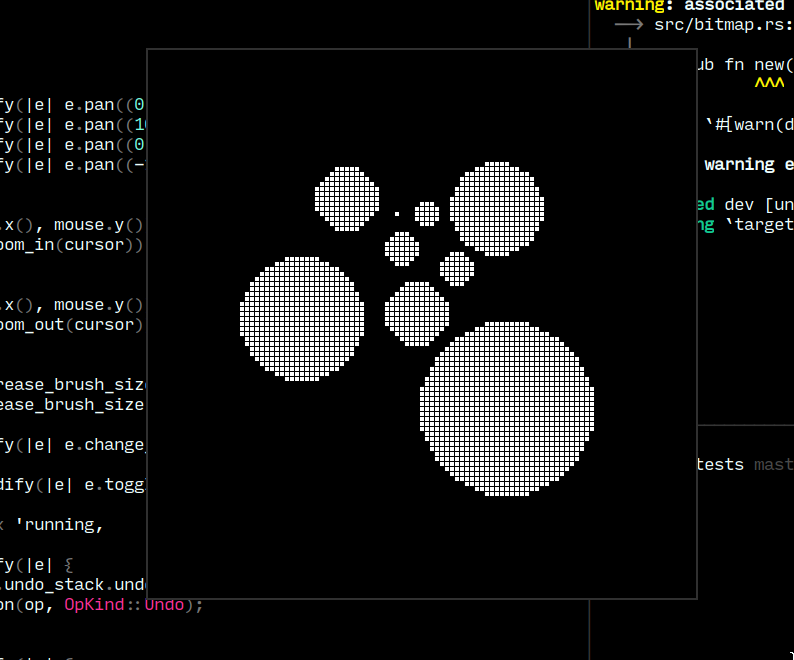
wanted to make was reworking the pixmap drawing procedure. The old
procedure draws a square for each pixel in the pixmap, coloured
according to its value in the pixmap. Naturally, this means, for an
NxN pixmap, there are N² calls to SDL!
I reworked this procedure to compress each line of the pixmap using RLE
(run length encoding), and call out to SDL for each run in the line.
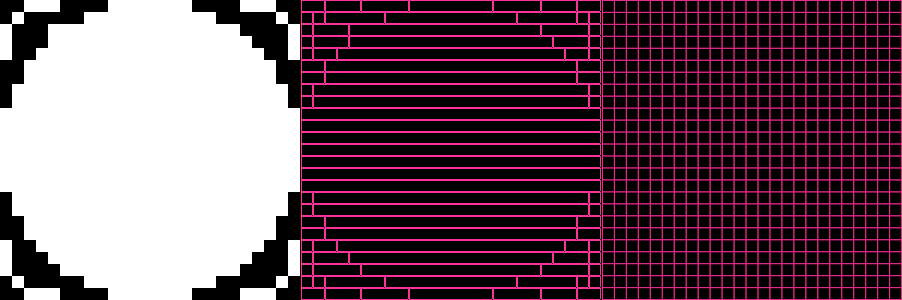
This drastically improved drawing speeds on larger grids. The following
is a comparison between the two procedures, the leftmost picture is the
rendered image, the middle picture is the optimized drawing procedure
(draws each run instead of pixel), and the right most picture is the
primitive drawing procedure (draws each pixel):
Day 17
I decided to give the text-only statusline a touch up, by adding a active color and dither level preview. Aligning the “widget” to the right of statusline involved a lot more than I thought, so I created a ghetto CSS-like rectangle placement system to position containers inside containers:
// roughly something like this
let statusline =
    Container::new(Offset::Left(0), Offset::Bottom(40))
    .width(Size::Max)
    .height(Size::Absolute(20));

let mut primary = Container::uninit()
    .width(Size::Absolute(16))
    .height(Size::Absolute(16));

container.place(
    &mut padding_box,
    HorAlign::Right,
    VertAlign::Center
);
The result (brush preview on the bottom right):
Day 16
The embedded lisp is coming along nicely, users can load a custom
rc.lisp, which is evaluated on startup. To disable to grid
on start, for example:
;;; rc.lisp
(toggle-grid)
Some aliases to switch between brushes:
;;; rc.lisp
(define (brush kind)
  (cond
    ((eq? kind 'f) (brush-fill))
    ((eq? kind 'c) (brush-circle))
    ((eq? kind 'l) (brush-line))
    ((eq? kind 'l+) (brush-line-extend))
    (else (brush-circle))))
The following script draws a straight line along a given axis, at a given distance from the canvas boundary:
Day 15
I began writing a standard library for the lisp, in lisp. It includes
basic list operations: car, cdr,
null?, list, higher order functions:
map, filter, fold:
(define (member? item ls)
  (fold #f
        (lambda (acc x) (or acc (eq? item x)))
        ls))
Day 14
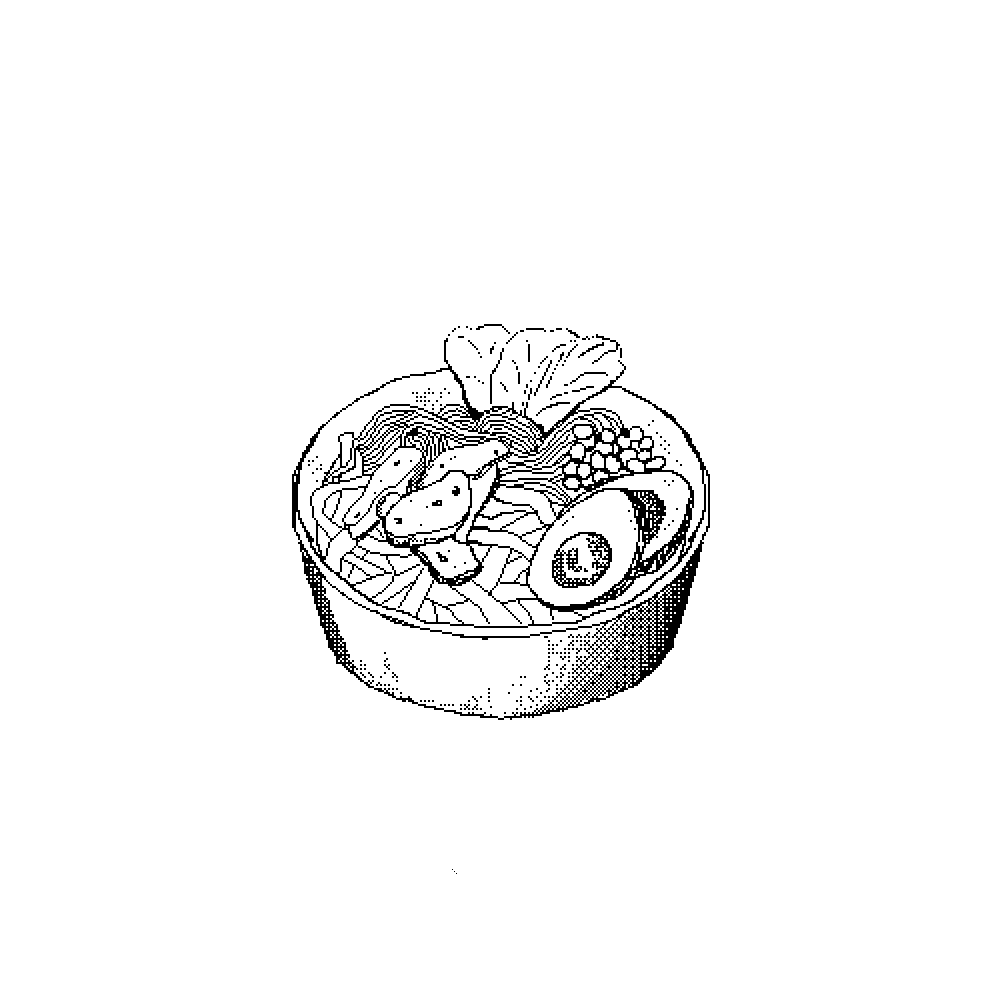
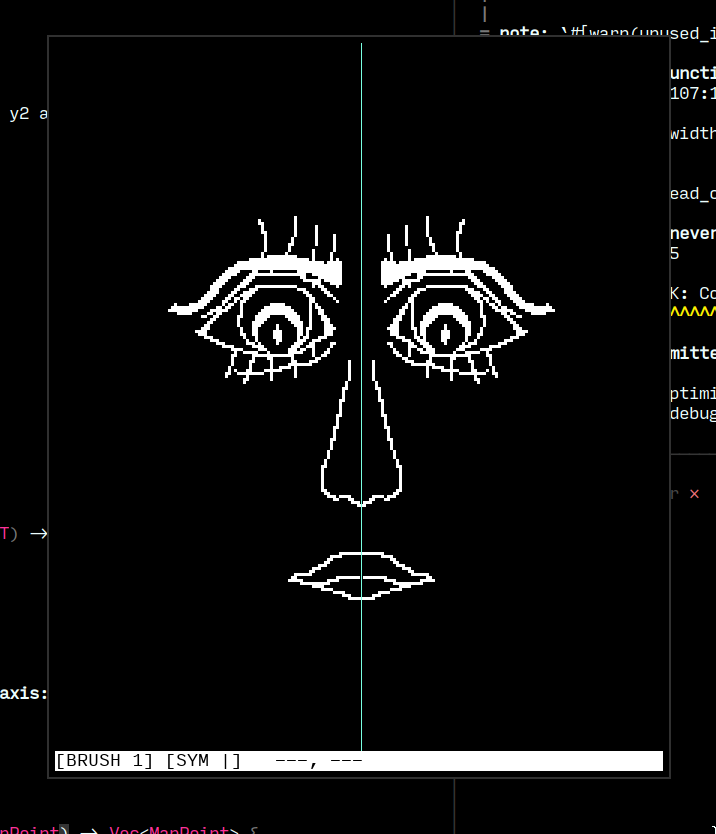
I attempted a small art piece using the editor, while it was largely usable, I felt a certain lack of feedback. The brushes just didn’t relay as much info as I’d have liked, for example, the approximate points of the line or the angle made by the line against the x-axis. Unfortunately, the existing infrastructure around brushes and line drawing didn’t easily allow for this either. I went ahead and reimplemented brushes, and added a new flood fill brush too:
Day 13
I added a few more forms to the lisp evaluator. It
handles recursion, definitions, variable mutation and more. The prelude
contains 20 subroutines so far, including comparision and logic
operators. The REPL interface on the SDL side requires some UX tweaks;
environment based completion, readline motions sound doable.
Day 12
I lifted most of murarth/ketos into the
editor. ketos’s implementation of lisp is too
vast for my use case. For example, the editor does not need data types
to handle raw strings or byte strings. I have got a basic evaluator
running inside the SDL2 context (notice the lisp REPL at
the bottom of the window). Over the following days, I intend to create a
set of prelude functions to manipulate the pixmap. Users can implement
their own brushes, dithering patterns, keybinds and more
(hopefully).
Day 11
I intend to supplement the editor with scripting language and an inbuilt REPL for the same. I began by implementing a text box widget from scratch, with history and readline like editing:
Day 10
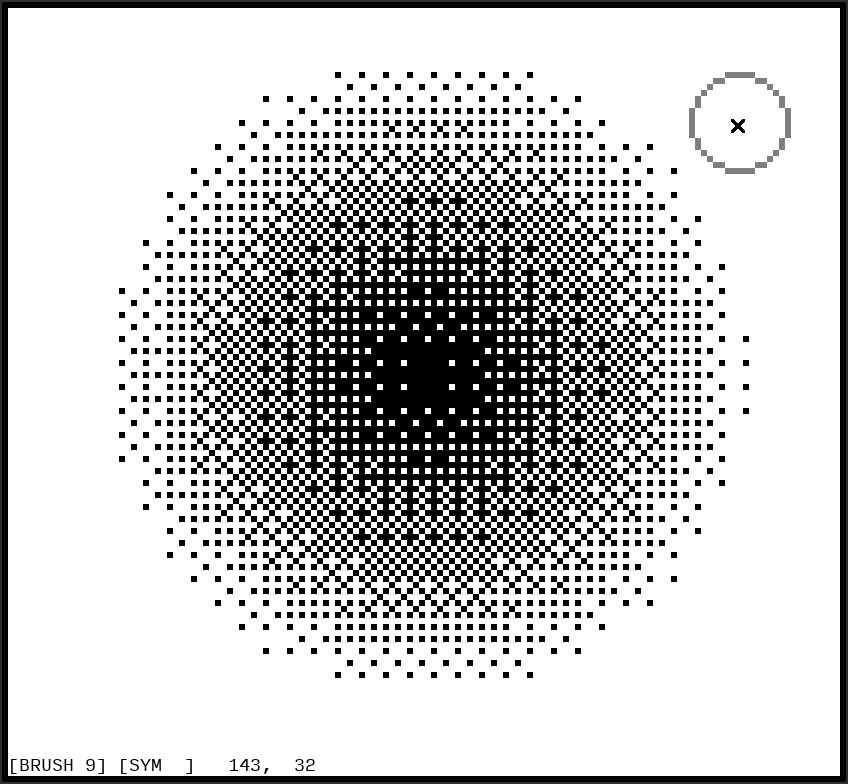
I started reading up on dithering methods and half-toning, I wanted to create a dithering brush that would automatically produce popular dithering patterns. The method that caught my eye (and also the one used most often in pixel art), was Bayer’s ordered dithering. When applied to a black and white image, each pixel, based on its intensity, is mapped to a 4x4 grid of pixels. A completely empty (completely black) 4x4 grid represents zero intensity, and a filled 4x4 grid represents full intensity. Bayer’s ordered dithering can produce 15 steps of intensity between zero and full (by switching on exactly 1 pixel more at each level), thus, being able to draw 17 “shades” from white to black. Creating a dithering brush from here was fairly trivial. Our pixmap is supposed to represent the final dithered image, it must be divided into 4x4 grids. Each grid is colored based on the intensity of the brush passing over it:
Day 9
I started working towards an interface. I like the idea of a largely
read-only HUD, i. e., an interface that simply describes the state of
the application. Changes to this state are initiated via keybinds or
text commands. I am proud of the symmetry indicator; - for
horizontal symmetry, | for vertical symmetry,
+ for radial symmetry.
Day 8
One of my favourite features of GIMP was symmetric editing. I added some coordinate geometry primitives to my pixmap abstraction, allowing for mirroring and reflecting figures about lines or points. The result was an ergonomic function that applies symmetry to any painting operation, (undo/redo works as expected):
let line = self.pixmap.get_line(start, end);
let sym_line = self.symmetry.apply(&line);
for point on line.extend(sym_line) {
    // draw to window
}
Day 7
Bresenham saves the day again! This time, I implemented his line drawing algorithm, to, well, draw lines. Each point on the line is then “buffed” based on the active brush size. Today’s changes fit in very well with the undo system and the brush size feature. Creating the right abstractions, one at a time :)
Day 6
I extended Bresenham’s algorithm to draw not just circle outlines, but also generate their fills. Unlike Bresenham’s algorithm, this variant generates points for two quadrants at once, these points are mirrored over the dividing axis to generate the other two quadrants.
Day 5
I discovered and implemented Bresenham’s algorithm for efficient circle drawing. The algorithm allowed for sized circular brushes, something I really liked from GIMP. Very convenient that the Wikipedia page for Bresenham’s algorithm also includes a section about optimizing for integer based arithmetic. I managed to abstract out another giant component of the application, the pixmap. Any image is just a grid of pixels (a pixmap), where the pixel’s value is decided by the application (1-bit in my case). I could potentially extend the application to a 24-bit image editor!
Day 4
I created a generic “undo stack” data structure that allows for infinite “undos” and “redos”. Every modification operation to the grid is persisted to the application state. A couple of keybinds allow the user to revert and re-apply these operations! I expect abstracting this component will come in handy down the line.
Day 3
I implemented the bare minimum required to call the program an “editor”. The application displays a grid, tracks mouse events, paints white to the canvas on left click, and black to the canvas on right click. I created a make-shift MVC architecture à la Elm in Rust.
Day 2
I started figuring out event handling today. Implemented a couple of keybinds to zoom in/out of the drawing area. Conversions of SDL2 coordinates (measured in signed 32 bit integers) to my internal “drawing area” coordinates (measured in unsigned 32 bit integers) is very annoying. Hopefully the unchecked conversions won’t haunt me later.
Day 1
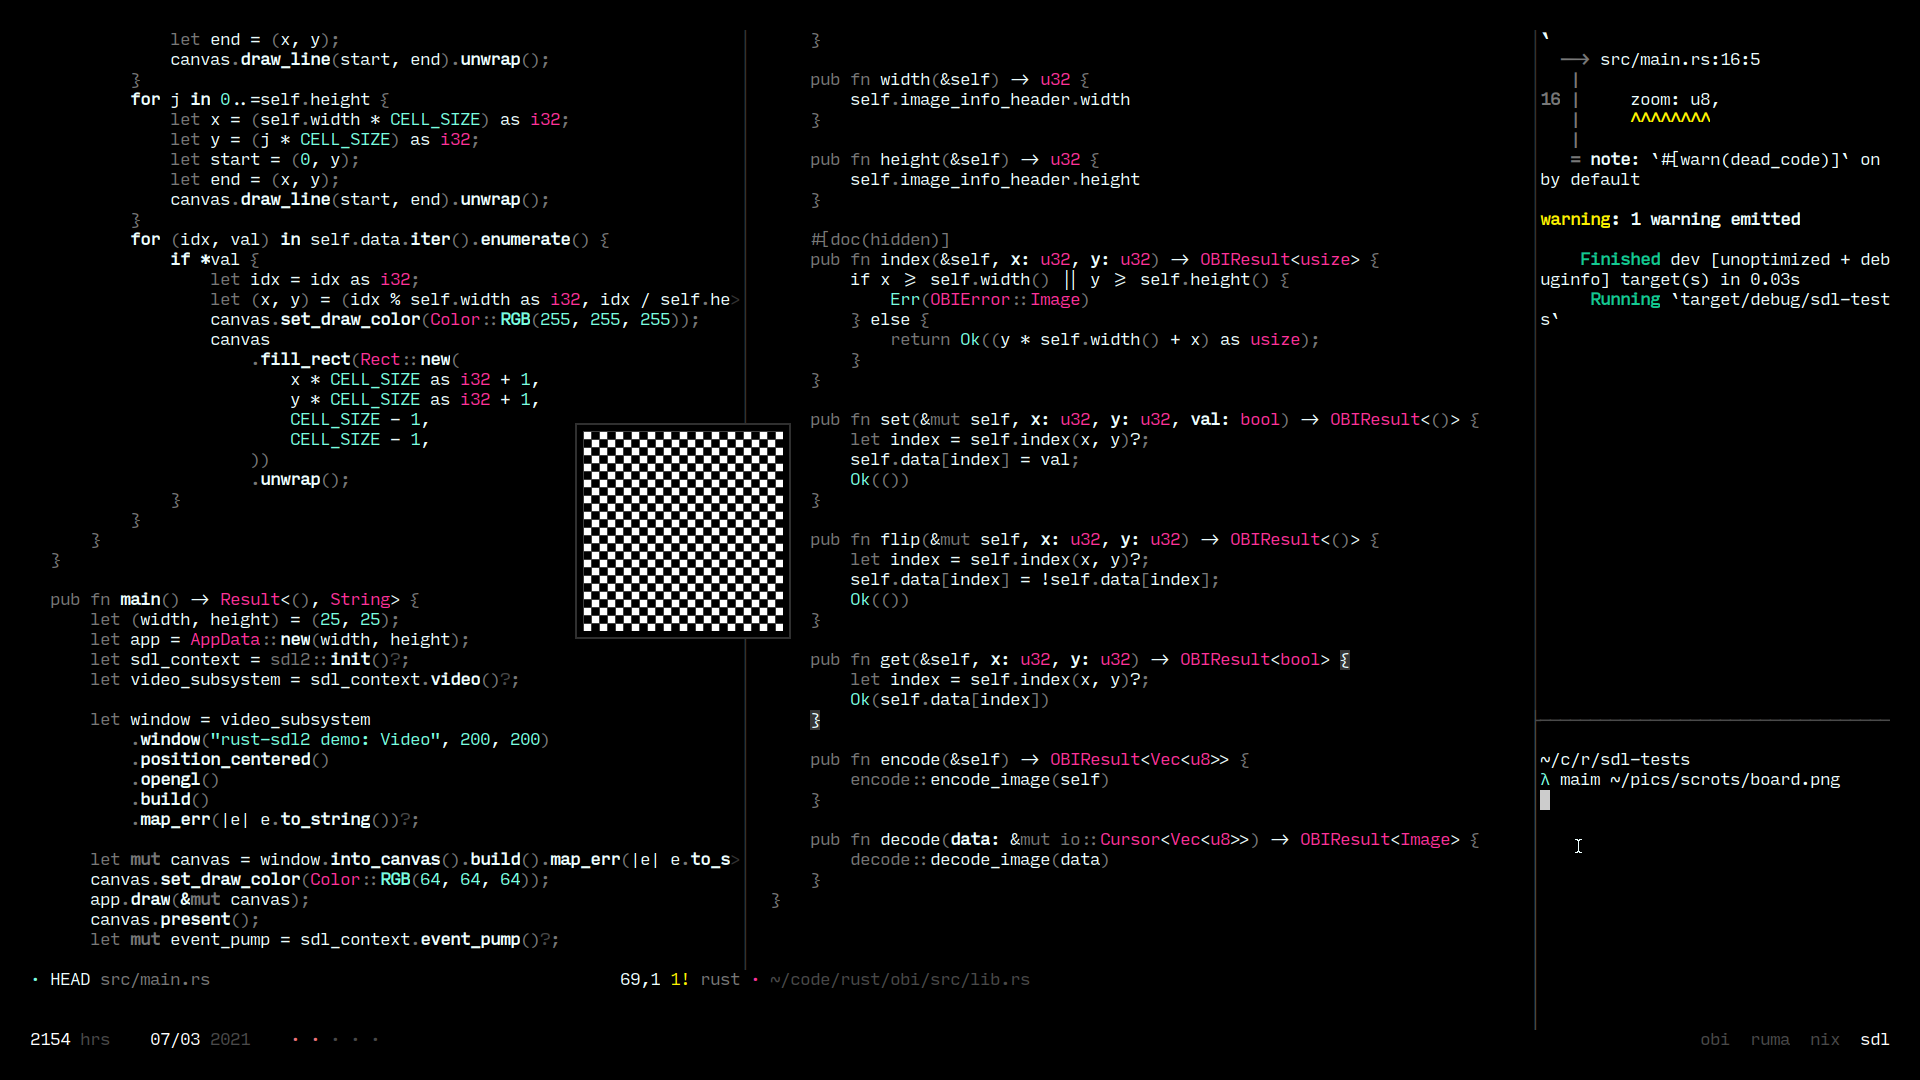
Getting started with Rust and SDL2 is very straightforward. The
rust-sdl2 library contains some detailed examples that
allowed me to get all the way to drawing a grid from a
Vec<bool>:
I'm Akshay, programmer and pixel-artist.
I write open-source stuff to pass time. I also design fonts: scientifica, curie.
Send me a mail at [email protected] or a message at [email protected].